Auto Layout is a powerful system within iOS development that allows developers to create adaptable and responsive user interfaces. Whether you're building an app for an iPhone, iPad, or any other iOS device, mastering Auto Layout is essential for ensuring that your UI looks great on all screen sizes and orientations. In this article, we'll dive into the essentials of Auto Layout, compare using Interface Builder versus programmatic Auto Layout, and address some common challenges and solutions. By the end, you'll have a solid understanding of how to use Auto Layout effectively in your mobile development projects.
Introduction to Auto Layout
Auto Layout is a constraint-based layout system enabling developers to define UI elements' relationships. Instead of specifying exact coordinates and sizes, you describe how elements should relate to each other and their containers. This approach allows your app's UI to seamlessly adapt to different screen sizes and orientations.
Why Use Auto Layout?
Auto Layout provides several benefits, including:
- Adaptability: Automatically adjusts to different screen sizes, orientations, and resolutions.
- Dynamic UI: Supports complex UI designs that change in response to content or user interactions.
- Maintenance: Simplifies the maintenance of your UI code, making it easier to update and extend.
Core Concepts of Auto Layout
To get started with Auto Layout, it's important to understand its core concepts:
- Constraints: Define the relationship between UI elements. Constraints can specify positions, sizes, and aspect ratios.
- Intrinsic Content Size: The natural size of a view based on its content. For example, a label's intrinsic content size is determined by the text it displays.
- Priority: Each constraint has a priority that determines its importance. Constraints with higher priorities are enforced before those with lower priorities.
- Ambiguity: This occurs when Auto Layout cannot determine a single solution for the constraints. Ambiguity needs to be resolved to ensure a stable layout.
- Compression Resistance and Hugging Priority: These properties define how a view resists being made smaller (compression resistance) or larger (hugging) than its intrinsic content size.
Using Interface Builder vs. Programmatic Auto Layout
Auto Layout can be implemented in two primary ways: using Interface Builder (a visual tool in Xcode) or programmatically (writing code). Both approaches have their advantages and use cases.
Interface Builder
Interface Builder is a graphical tool in Xcode that allows you to visually design your app's UI. Here's how to use Auto Layout with Interface Builder:
1. Adding Constraints: Select a UI element, and then click on the "Add New Constraints" button or use the control-drag gesture to create constraints between elements.
2. Editing Constraints: You can edit constraints by selecting them in the document outline or the size inspector. Adjust the constant, priority, and other properties as needed.
3. Previewing Layouts: Use the preview feature to see how your layout adapts to different screen sizes and orientations.
Advantages of Interface Builder:
- Visual Feedback: Provides immediate visual feedback, making it easier to understand the layout.
- Ease of Use: Ideal for simple and moderate complexity layouts.
- Quick Iteration: Allows for quick iterations and adjustments without writing code.
Disadvantages of Interface Builder:
- Complex Layouts: Can become cumbersome for highly complex layouts with many interdependent constraints.
- Merge Conflicts: Collaboration on Interface Builder files can lead to merge conflicts in version control systems.
Programmatic Auto Layout
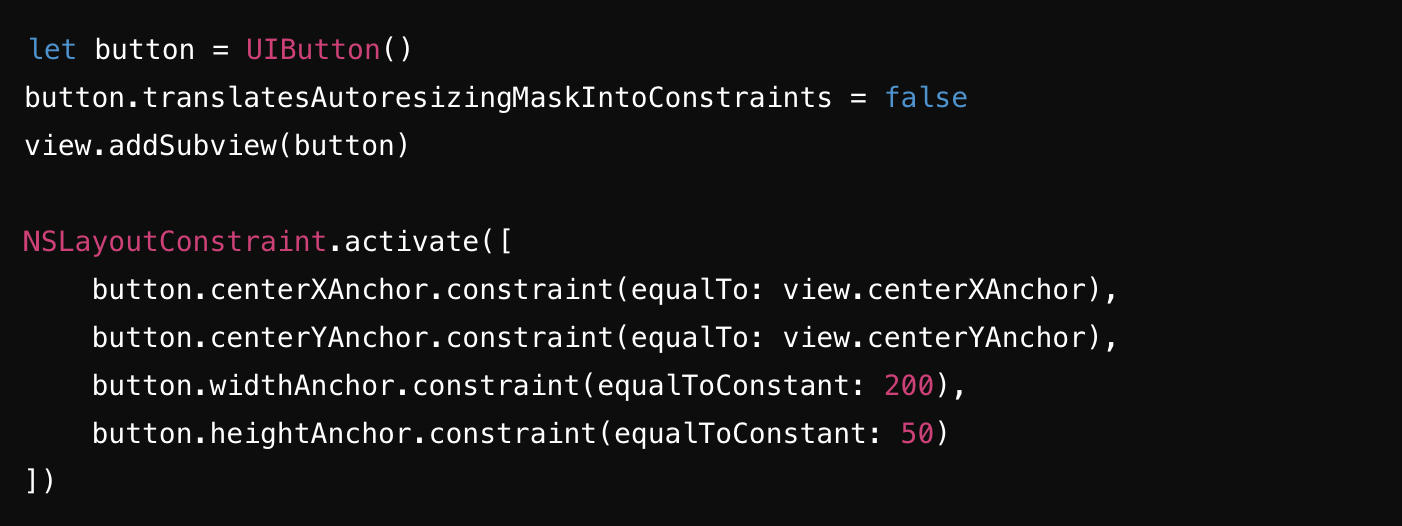
Programmatic Auto Layout involves writing code to define and manage constraints. Here's how to set up Auto Layout programmatically:
1. Disable Autoresizing Mask: Set `translatesAutoresizingMaskIntoConstraints` to `false` for each view you want to use Auto Layout with.
2. Create Constraints: Use `NSLayoutConstraint` to create constraints and activate them with `NSLayoutConstraint.activate()`.
Advantages of Programmatic Auto Layout:
- Flexibility: More control over dynamic and complex layouts.
- Version Control: Easier to manage and merge code changes in version control systems.
- Reusability: Constraints can be encap0sulated in reusable functions or extensions.
Disadvantages of Programmatic Auto Layout:
- Verbosity: Can result in more verbose code compared to Interface Builder.
- Steeper Learning Curve: Requires a deeper understanding of Auto Layout concepts and syntax.
Common Auto Layout Challenges and How to Solve Them
While Auto Layout is a powerful tool, developers often encounter challenges when using it. Here are some common issues and their solutions:
Ambiguous Layouts
Problem: Ambiguity occurs when Auto Layout cannot determine a single solution for the constraints.
Solution: Use Xcode's Auto Layout debugging tools to identify ambiguous layouts. Ensure that you have sufficient constraints to define the position and size of each element. Avoid conflicting constraints and use appropriate priorities.
Conflicting Constraints
Problem: Conflicting constraints happen when two or more constraints cannot be satisfied simultaneously.
Solution: Identify and resolve conflicts by adjusting constraint priorities or removing unnecessary constraints. Use the "Resolve Auto Layout Issues" menu in Interface Builder to help diagnose and fix conflicts.
Unwanted Constraint Changes
Problem: Constraints might change unexpectedly, leading to a broken layout.
Solution: Ensure that constraints are set up correctly and are not being modified unintentionally. Use breakpoints and logging to track changes to constraints during runtime.
Handling Different Screen Sizes
Problem: Your layout might not look good on all screen sizes and orientations.
Solution: Use size classes and trait collections to adapt your layout for different screen sizes. Test your app on multiple devices and orientations using Xcode's preview and simulator.
Dynamic Content Size
Problem: Dynamic content, such as labels with variable text, can cause layout issues.
Solution: Use intrinsic content size and content hugging/compression resistance priorities to handle dynamic content gracefully. Ensure that constraints are flexible enough to accommodate changes in content size.
Performance Issues
Problem: Complex layouts with many constraints can impact performance.
Solution: Optimize your layout by reducing the number of constraints and using simpler layouts where possible. Profile your app using Instruments to identify and address performance bottlenecks.
Conclusion
Mastering Auto Layout is crucial for creating responsive and adaptable UIs in iOS development. Whether you prefer using Interface Builder for its visual feedback or programmatic Auto Layout for its flexibility, understanding the core concepts and common challenges will help you build better apps. By following the tips and tricks outlined in this article, you'll be well on your way to becoming proficient in Auto Layout and enhancing your mobile development skills. Remember to test your layouts thoroughly on different devices and screen sizes to ensure a consistent and polished user experience.
With Auto Layout, you can create stunning, dynamic, and user-friendly interfaces that work seamlessly across the diverse range of iOS devices. Happy coding!


